Jedisaber.com
Original Content:
Home
| Books
| eBooks
| Other
| Links
| Fan Content:
Andromeda
| Avatars
| Anime
| Dark Angel
| Matrix
| Pern
| Stargate
| Star Trek
| Star Wars
 Sigil Tutorial - Formatting Your Content:
1. Overview | 2.
Importing Your Content | 3. Formatting Your Content |
4. Walkthrough
Now that we have some content in Sigil, let's make it look good!
We're to the real meat of this tutorial now, there's lots of topics that we
can cover here. I'm going to cover some of the most common ones in no particular
order. If there's something you want to know how to do, and don't see it here,
e-mail me (e-mail is at the bottom of this page) and I'll eventually get around
to adding it here (I might get to it faster if you donate...)
How to:
How to make text Bold, Italic, and Underlined
There's a button for that. See the first page of
this tutorial
How to make style paragraphs professionally (How to use
CSS in Sigil)
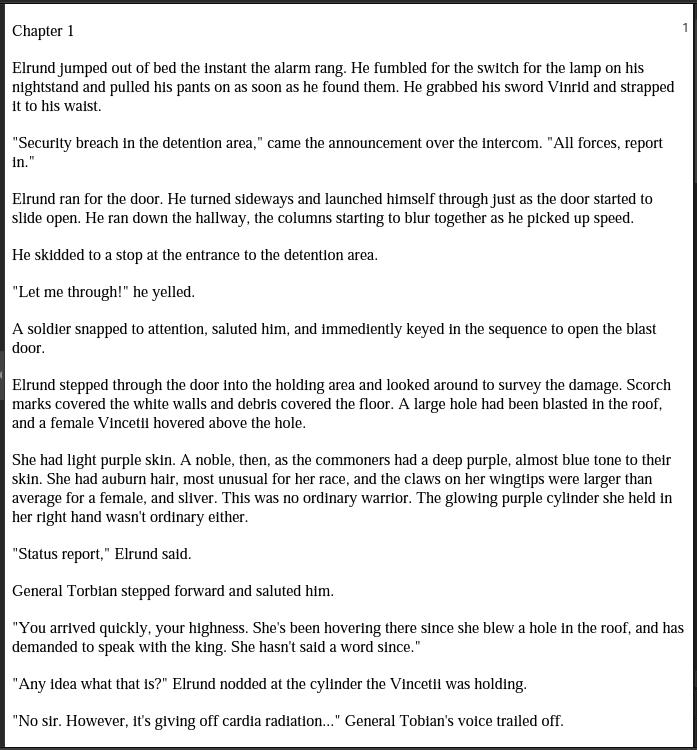
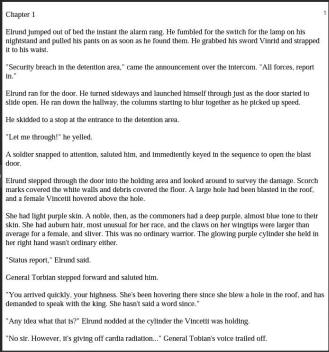
A picture is worth a thousand words here, so enjoy the following screenshots
(click them to enlarge):
No CSS
With CSS
I'm going to steal content from my manual tutorial here, as the CSS is the
same. What's different, is that it's a lot easier to add a Cascading Style Sheet
to your ePub file using Sigil than it is by hand.
/* Style Sheet for ePub Books */
/* Set margins at 2% (This gives a white border around
the book) */
body {margin-left:2%;
margin-right:2%;
margin-top:2%;
margin-bottom:2%;}
/* Text indent will make a paragraph indent, like
putting a tab at the beginning of each new paragraph
The margin settings get rid of the white space between paragraphs, again so it
looks more like a book
The text-align line justifies the margins. If you don't want them justified,
change it to left, or remove that line
You don't have to specify a font, but you can */
p {text-indent: .3in;
margin-left:0;
margin-right:0;
margin-top:0;
margin-bottom:0;
text-align: justify;
font-family:"Times New Roman";}
/* Here we make our headings centered
We've also made the headings the same font as the body text */
h1 { text-align: center;
font-family:"Times New Roman"; }
h2 { text-align: center;
font-family:"Times New Roman"; }
h3 { text-align: center;
font-family:"Times New Roman"; }
How to use all that green stuff:
1. Create a new Style sheet for your book: (If your book already has a
stylesheet in it, you can just double-click it to edit it. Some converters will
create a stylesheet for you, but you might want to modify it to change how your
book looks.)
Click: File>>New>>Blank Stylesheet
This will add a stylesheet to the book browser pane, and open it for editing.
(You might want to re-name it, for simplicity sake. To re-name the stylesheet,
right-click it, and click, "Rename". Type in the name you want. (I usually just
remove the numbers.))
2. Enter your CSS code
Any CSS code you want can go here. (Check the manual tutorial for the link to
the IDPF page that lists the allowed CSS)
Fee free to copy the green CSS code from above and paste that in.
Close the stylesheet. (click the "X" next to the sheet's name on it's tab)
3. Add a link to the stylesheet on each file in your book that you want the
code applied to. (Skip this step if your book already has a stylesheet.)
- Click on the tab for your content, if it's open, or double-click on the
name of the file you want to apply the code to in the book browser (the left
hand pane).
- Click the "Code View" button
- Add a new line after the line that starts with "<title>"
- copy this code: <link rel="stylesheet"
type="text/css" href="../Styles/Style0001.css" />
- Paste into the new line you made in step c. (make sure that if you
re-named your stylesheet, you need to change this line too.)
4. Repeat step 3 for each file in your book that you want to apply the
stylesheet to.
How to Make a Table of Contents
In Sigil, making a table of contents is really easy. It does most of the work
for you. All you have to do is make the text you want to be in the table of
contents a heading, then click a button.
- Highlight the text you want to be in the TOC (Table of Contents).
(Usually, this will be the chapter headings, the big, "Chapter 1" and
whatnot at the beginning of each chapter.
- Click the arrow to the right of "
 "
up in the upper left-hand corner.
"
up in the upper left-hand corner.
- Select a heading style (Heading 1, Heading 2, etc). (Normally, you'll
want to choose "Heading 1". If you have sections under each chapter that you
want to show up in the TOC, you'll choose "Heading 2" for those.)
- Repeat Steps 1 - 3 for all your chapter headings.
- Click the "
 " button in the bottom right corner of the Sigil window.
- Sigil will think for a moment, then the Table of Contents will show up
in the pane right above the button.
How to make a section divider
A section divider is that line, image, or line of asterisks in books that
goes between different scenes, or when you jump to a new character's point of
view. You usually use them when you need such a divider, but don't want to start
a new chapter yet.
In Sigil, you can do a section divider several different ways. You can use
the asterisks, insert an image, or use a horizontal line (like the green ones
that space out the different sections in this tutorial.)
I'd recommend putting at least one line of whitespace on either side of the
section divider, this helps separate the sections a little more. (You do this
the same way you would in a word-processor; just press the enter key before and
after the section divider.)
- To use an image, see the next section below.
- To use asterisks, just type three or four of them in (it looks nicer
with a space between each of them) and then highlight them and click the
 button on the toolbar to center it.
- To use a horizontal line:
Unfortunately, Sigil doesn't have a button to do this. We have to get messy
in the XHTML code. Don't worry, it's not that hard.
- Click the
 button to switch to code view
- Put the cursor at the end of the line (after all that code stuff
that comes after the last word) where you want the horizontal line to
go.
- Press the ENTER key.
- Type: <hr width="75%" color="#008000">
- This will make a horizontal line that takes up 75% of the screen
width, and is green. If you want it to be longer or shorter, just change
the "75" in the code to whatever percentage you want.
- If you want a grey line, remove the
color="#008000" line.
- If you want a different colored line,
Click Here for a list of hex color codes, and replace the numbers in
that sample with the numbers for the color you want.
- (Click
 to exit code view.)
How to insert an image (and notes on Cover images)
Inserting an image is a two-step process. As you learned in the
manual tutorial, an ePub book is composed of a
few parts; the content, the XML files that describe the content, and the package
that holds all that stuff. As a result of that, to add an image to your book, we
first need to add the image to the package (you know, so the person who reads it
only has to download one file that has everything they need.)
- Click in the book where you want the image to go.
- Click: "File>>New>>Add Existing File"
- This will open a regular file open box where you can find the image you
want to add.
Click the filename for the image, then click the "Open" button.
- This will add the image to the ePub container.
If you click the + sign next to "Images" in the left-hand pane in Sigil,
you'll see the filename for your image there.
- To add the image to the book, click the
 button in the toolbar.
- The following window will open:
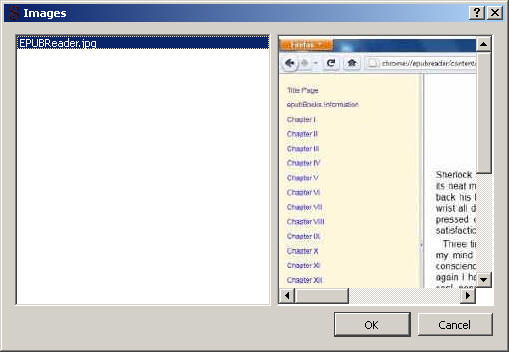
The left side of this window will show the names of all the images that have
been added to this ePub file. If you click on a filename, a preview of
that image will show up in the right side of the window.
- Click the "OK" button.
Notes on Cover Images:
Use the following guidelines to ensure that most reader software will be able
to show a preview of your books cover image. You should follow ALL of the below
guidelines to ensure that a preview image will show up in most readers.
- The cover image should be named "Color.jpg"
- The cover image should actually be in the JPEG format. Most cover read
PNG and GIF formats, but one or two of them will only properly display JPEG
files as the cover image)
- The cover image should be the first thing in the book. (Some reader
software grabs the first image and uses that for the cover, some look for a
file named "Cover.jpg" and use that, and some look for both. Thus, if you
follow both of these guidelines, the cover will display properly on almost
every reader.)
- The cover should have the alt text "Cover". Alt text is text that is
displayed when an image can't load for whatever reason.
To set the alt text for the image:
- Click the
button to enter code view.
- The code for the cover image should look something like this (it
might have some height and width settings in there too):
<img src="Images/Cover.jpg" />
- Add "alt="Cover"" so it looks
like this:
<img alt="Cover" src="Images/Cover.jpg" />
- Click
to exit code view.
- The cover image should be in it's own XHMTL file named "Cover.xhtml".
- (The cover image is the first thing in the book, right?)
Click just below the image to put the cursor after the cover image.
- Click the
 button in the toolbar.
- Tada! The cover image is now in it's own file! (That was easy!)
- Right-click on the filename for the cover in the book browser (The
left-hand pane)
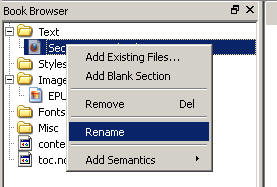
- Click "Rename"
- Rename the file to "Cover.xhtml" (Without the quotes)
- If you want the cover image to show up in the Table of Contents: (and
you might want to do this anyway. Some readers won't show the cover image as
a thumbnail if it's not defined in the ePub's structure. And, you want your
readers to be able to easily see your pretty cover picture, right? ;) )
- Click
to enter Code View.
- Find the line of code for your cover image. It should look like
this:
<img alt="Cover" src="Images/Cover.jpg" />
- Change it to look like this:
<h1 title="Cover">
<img alt="Cover" src="Images/Cover.jpg" />
</h1>
- What is all that?
<h1></h1> is how you make a heading
in HTML, so to make our cover a heading, we put it inside these tags.
Why do we want to do that? Well, remember that Sigil will auto-generate
our Table of Contents based off from the heading tags (scroll up for how
to do this), so if we want our cover image to show up in the Table of
Contents, we want to make it a heading.
The title="Cover" bit is the text
that shows up in the Table of Contents. Most of the time, only text is
going to be in-between those heading tags, so whatever text is there is
going to show up in the Table of Contents. In this case, there is no
text. Sigil uses that title attribute to over-ride whatever the text in
the heading tags is when it generates the Table of Contents. More on
that in a different section.
How to edit meta-data (Author name, genre, ISBN and
all that)
Meta-data is all the information about the book that's not really in the
book. Well, it might be on the copyright page, but this is how you make sure
that the reader software knows what the book's title is.
- Click: "Edit>>Meta Editor..."
- The following window will open:
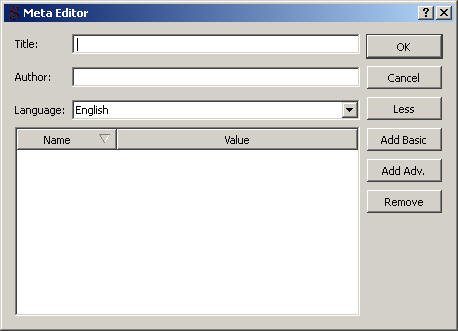
- Type the name of the book in title. (I don't need to explain the
"Author" box, do I?)
- You can click the "Add Basic" or "Add Adv." buttons to add all kinds of
other information like the ISBN, copyright, and all that other stuff too.
- Click the "OK" button when you're done.
How to make a Chapter Break / make a section always
be on a new page (insert page-break)
There a few options to always make a section start on a new page in an
eReading app. Each different file inside the ePub container will do this. If you
want the content to be in the same file, but still start on a new page, you can
do that too.
You can spit a section off into it's own file by clicking the
 button in Sigil.
If you want to keep content in the same file, but still have it be at the top
of a new page, switch to Code View and add this line where you want the page
break
<div style="page-break-before:always;"></div>
That's it! Note that the page-break won't show in Sigil, but it will in your
e-reader.
Was this guide useful to you?
You can also follow my blog for updates on books I write, and also some ePub
content: http://aarondemott.blogspot.com
Please consider donating a small amount to help pay the server costs. You don't
have to, but if you would like to, I'd be very thankful!
Download this Guide
Download this guide as an ePub file
Comments? Questions?
If you have any comments, notice any bugs, or have any questions on any of the steps
here, please e-mail me at: yoda47 (at) jedisaber (dot) com